![Beginners cross stitch: the ultimate tutorial [Updated July 2021]](https://peacockandfig.com/wp-content/uploads/2017/05/Love-finished-8-1000px-compressed.jpg)
Have you ever looked at beginners cross stitch projects and didn’t even know where to start? Or have you tried to learn on your own and got hopelessly lost? Well you’re in the right place, grasshopper, help is at hand! 🙂

First things first, there are two paths you can take to learning how to be a cross stitch master (kind of like being a Zen master, but more stabby… 😂). If you want to take the superhighway and learn everything you’ll need to know to go from complete beginner to stitching up your first cross stitch hoop project in only an hour, then this is the path for you — you can learn to stitch the pretty Love hoop art pictured above with the Cross Stitch Fundamentals class. The class will teach you everything you need to know from what materials to use, how to do the actual cross stitch, and even how to finish the back of your hoop for gifting or displaying. The class comes with the pattern shown for free, as well as instructions for how to read and follow a cross stitch pattern. And PS, this link will also give you access to a free thirty-day trial to Skillshare in case you’re not already a member, which is pleeeenty of time to go through the class and complete your project. You’ll also be able to take any of the other Peacock & Fig stitching classes on Skillshare as well. 🙂 I’d really recommend taking the class if you’re a beginner or don’t have a lot of time on your hands — you’ll learn everything you need to know in a much more condensed way than by skipping around individual tutorials, and the class will take you through one full project from beginning to end.
Or, if you’d like to go the longer and more windy road to learning the basics of cross stitching (or to augment what you already know), the below collection of tutorials and tips is a roundup of some of the most popular tutorials for beginners. If you’d like to see more information on any of the topics, click the title to be taken to the full blog post.
Disclosure: Please note that some of the links in this post are affiliate links and if you go through them to make a purchase I will earn a commission (such as from Amazon). Keep in mind that I link these companies and their products because of their quality, and not because of the commission I receive from your purchases. I would never recommend something I wouldn’t use myself. 🙂
Quick beginners cross stitch tutorial
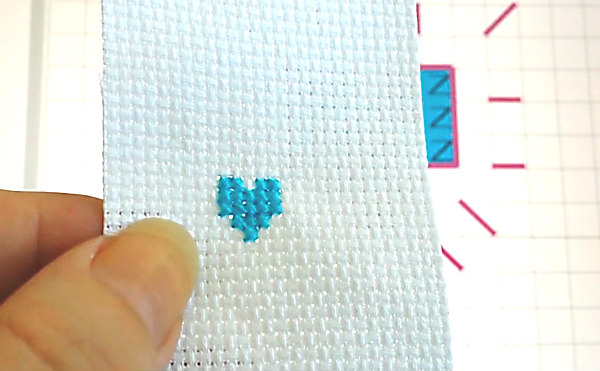
First off, the video below shows a quick overview of how to cross stitch. I briefly discuss how to do the loop method to start (as well as just using a simple knot if that’s easier), and how to do full cross stitch and backstitch. In this video, I demonstrate with the little free cross stitch pattern Tiny Heart how to follow a cross stitch pattern. Most Peacock & Fig patterns use only full cross stitches and back stitch, so by learning these simple stitches you can stitch almost all of the patterns in the cross stitch pattern shop! So start with this brief video, and then if you would like more information, see below for more detailed videos! Any links I mention in the videos are listed at the bottom of this post.
Cross stitch basics: materials needed
In the video below, I go into more detail about the materials that you need to start stitching. Cross stitch is such a simple craft and you only need a few basics to get started with a beginners cross stitch project. Cross stitch fabric, tapestry needles, embroidery floss and scissors are your basics, and I also demonstrate a few different ways to hold your fabric such as embroidery hoops and scroll frames.
Cross stitch basics: stitching a cross stitch
If you’re unsure of how to form a cross stitch itself, this video shows more details about how to do that. In cross stitch you’re making two small diagonal stitches / and \, and overlapping them so they make an X. There are two main methods of stitching a cross stitch. The English method is when you form one “leg” of your stitch and then the other, completing your stitch before moving onto the next stitch. The pictures below show the Danish method, which is doing one half of your stitches in one direction, and then coming back and finishing the top half of the stitch. There is no right or wrong method, you can try both and see which method you prefer. Click here to see a full tutorial on the English versus the Danish method. In cross stitch it’s good to practice having your top stitches always going the same way. It doesn’t matter which way you prefer (/ or \), but if you form the habit when you first start stitching it’s a lot easier to always do it that way. You want your top stitches facing the same direction as they reflect the light more evenly across the piece once it’s finished, so the colours look uniform.
Cross stitch basics: how to follow a pattern
Once you have practiced your basic cross stitch a bit and you’re comfortable with it, the next thing you will want to do is practice with a pattern. In the video below you’ll see what a cross stitch chart looks like, and what the symbols mean. Here is the blog post with the free cross stitch chart featured in the video. For your first cross stitch project, just make sure you have enough fabric to stitch the design. The finished size is usually indicated on patterns. The little free pattern featured in this video is approximately 1 ½” square (4 cm) on 14 count fabric. As long as you have a few inches spare around the edges, don’t worry too much for your first project about getting it centred on the fabric. There’s another video tutorial showing you exactly how to do that below in this post, or you can see the tutorial about how to centre your fabric here.

Cross stitch basics: how to backstitch
One stitch that is very useful for cross stitch beginners is backstitch. Backstitch is found in many cross stitch patterns. It’s the (usually) thin black lines that give details to a design, such as whiskers, facial expressions, and outlines. Here is an image of stitching the backstitch in the That’s What She Said cross stitch pattern — it really brings the pattern to life. Backstitch can also be used for writing and text on the pattern, or even signing your initials in the corner of a completed piece. It’s a very simple stitch, it just takes time to do. You stitch the backstitch after the cross stitch is done (as sometimes it crosses over your cross stitching), and many stitchers prefer to leave it to the last part of their project.


Cross stitch basics: washing cross stitch
The last thing important skill in this beginners cross stitch series is learning how to wash your cross stitch at the end of your stitching project. The video below shows you the easiest way to do this, so it won’t take you long at all. No matter how careful you are with keeping your hands clean while you stitch, oils from your hands will always transfer to your floss and fabric. Over time these oils will start to turn your project yellow, and eventually it will start to deteriorate. To protect all the hard work you just did, the best practice is to wash your pieces before you finish them or frame them.
Bonus videos for cross stitch beginners
Below are three videos to help beginners get more out of their stitching projects. These will give you extra skills to boost your confidence as a stitcher, and help you progress to more advanced skills. Cross stitch is a very simple craft, but there are many techniques and tricks to make stitching more enjoyable and improve how your finished product looks.
Cross stitch tutorial: the loop method and pin stitch
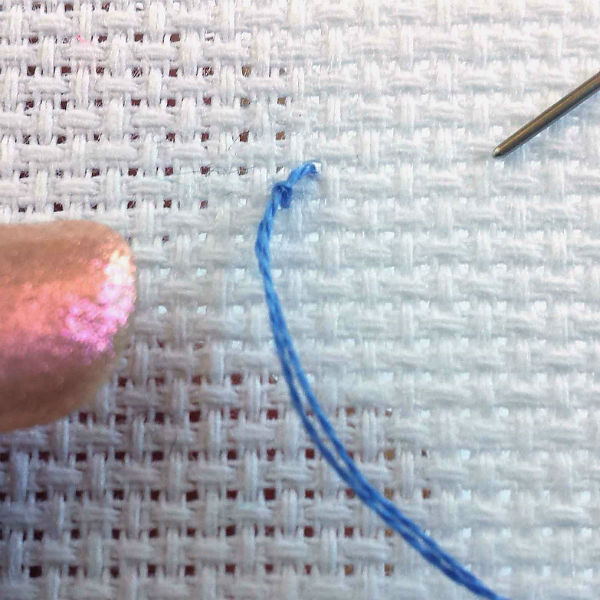
This first video is how to start your stitching using the loop method, and how to end your threads using a pin stitch. These two techniques mean you will never have to make a knot ever again, which keeps your back from ending up with lumpy knots. The loop method is very simple — you fold your floss in half and “anchor” your thread by passing your needle through the loop. Here are some images demonstrating this:

The video shows how exactly to do this, and shows how to use a pin stitch to end your thread. You can also use a pin stitch to start your thread, it’s a really versatile stitch!
Cross stitch tutorial: how to start cross stitch patterns in the centre
For a small pattern, as long as you have enough fabric it’s not really important whether you get your stitching exactly centred. As in the little Tiny Heart key fob pattern demonstrated in the first video, sometimes you’re going to trim the project close to your stitching so you don’t need to have a big margin. But if you’re working on a bigger or more complex piece, it is very important to make sure you’re starting in the right place, and that your pattern will be centred on the fabric when it’s stitched. Otherwise, you could run out of room for framing or finishing. You could even run out of fabric if you accidentally turn the fabric lengthwise instead of horizontally when starting to stitch, or get the pattern too far off centre. I’ve seen photos of projects that have taken months to get to a certain stage, only to have the stitcher end up in tears because they will run out of fabric as they didn’t centre their piece properly when starting. The video below will show you a few quick tips about how to make sure this never happens to you, and what size margins you should add onto your fabric before cutting it or starting stitching.
Cross stitch tutorial: don’t worry about the back of cross stitch projects
This video talks about the “controversial” theories behind whether you should worry about what the back of your cross stitch projects look like. Especially as a beginner stitcher, it’s easy to get discouraged when you hear well-meaning people tell you “the back is supposed to look like the front.” There are four main reasons that you should be mindful of what the back looks like once you advance in your stitching:
- You’re entering the stitching into a competition or fair where the back will be judged.
- You’re using very sheer or delicate fabric.
- Lumps and tangles on the back will be seen from the front when framing.
- You could use up a lot more floss if you carry your threads too far across the back.
Other than these reasons, please try not to be critical of what the back looks like. In the video you’ll see some examples from my own stitching, and from an embroidery artist who celebrates what the back looks like. If you find having a neat back relaxes you, then please do it, but otherwise don’t stress about it. The whole point of stitching is to relax and enjoy the process.
Other cross stitch tutorials mentioned in the videos
Below you’ll find a few links to help you learn more skills! If you subscribe to the Peacock & Fig YouTube channel, you’ll be notified of when new video tutorials come out! There are several playlists in the channel (including the beginners cross stitch playlist listed below). If you have any questions or would like to learn a technique that’s not covered in the videos, please leave a comment below! If you enjoyed these videos, please share this post with your friends, and share the stitchy love! Happy stitching!
- Cross stitch for beginners YouTube playlist
- How to finish the project as a key fob (how to do slip stitch)
- Join the Peacock Lounge and get the free cross stitch patterns
Want a head start with some recommendations of stitching materials, tools, and stitchy books? Head to the Peacock & Fig Amazon page! 😀


48 Responses
Moe lester
Hey Dana, Im really impressed with your tutorial, I’m totaly going to use it in life. Its not like im forced to do this. Thanks
Dana Batho
Glad it was helpful Moe! 😊
Aunt Kelley
Thank you : ) This has been my go-to for when I get stuck and need tips.
Dana Batho
Glad it helped Kelley! 🙂
James Finch
Hi there! thanks for the tutorial, what starter cross stitch kits would you recommend for beginners? i was browsing some online store i came across this website https://passioncrafts.co/ browsing their catalogue for beginner cross stitch, do you recommended some of their beginners cross stitches? https://passioncrafts.co/collections/cross-stitch-kits-beginner thanks!
Dana Batho
Hi James! I wouldn’t recommend that site, looks like some of the designs are stolen patterns (aka they’re identical to designer patterns that I know, and they’re not crediting the designer in the listings). You don’t really need to buy a kit to get started, in my tutorial I go over all the materials you’ll need (you’ll spend way less money buying all the bits and pieces on your own). I’d recommend Hobbycraft if you’re in the UK, they’re a reliable source of materials and patterns — https://www.hobbycraft.co.uk/sewing/embroidery-and-cross-stitch/cross-stitch-kits. Just make sure to choose something really small and simple if it’s your first project, otherwise you might get overwhelmed. If you do end up buying your own fabric, floss, etc, you can use the freebie patterns I show in my beginner tutorials, they were designed specifically for beginners to help you get started. 🙂
www.handiscakes.com
You got a very wonderful website, Gladiolus I detected it through
yahoo.
Dana Batho
Glad you enjoy it! 🙂
tattoodata.online
I really lucky to find this web site on bing, just what I was looking for :
D also saved to my bookmarks.
Dana Batho
Awesome, glad it helped! 🙂
Mommabug11
Hello. Thanks so much for the tutorial! Especially the starting/ending loops – wonderful!
I just decided I wanted to learn and picked up a pattern on Amazon trying to follow some YouTube guides but the question I’ve got that I can’t seem to find an answer to (and it may be I’m not explaining properly) … how far should I skip, at max, in a stitch with one color?
To clarify… I have a large pattern (about 13 inches rectangular) and I have it in a larger hoop (8-10″) but the pattern has a lot of very intricate details – over 30 colors of floss are used in this pattern! – so I may have 14 stitches together in a group, but similarly I may have 14 stitches in a group and none of them are the same floss color in that little group, but there are “dots” of this color all over. Do I tie up my ends and only stick to “groups”? Or can I jump over 7-8 spaces and pick up using my same thread/etc until I run out of floss on my needle? It leaves a half inch “line” in the back – but wondering if that might end up causing me hassle later…
Wondering if there’s some “rule of thumb” that I should be using – ie: don’t start a new stitch more than 5 “squares” away or something? And if so… what do you do if you have just one stitch – can I still “loop lock” and “pin tuck” my ends?
It’s my first one so I’m not worried about running out of floss as I know I can get more and I know I probably will due to growing pains as I learn how to best keep it from getting tangled and such… but more for making sure I’m not going to create a larger problem in the back (or habits picked up) as I get more comfortable with this or decide it’s worthy of display when/if I finish it.
[Sorry for the essay, lol, but thanks in advance!]
Dana Batho
Hi there! There are no real rules about how far to carry your threads. Some stitchers were told “no more than x stitches” by their grandmother, but to be honest all those “rules” were just made up. Just do what’s best for you, have fun and experiment. The only thing to know about carrying your floss too far is it will use up floss, if it’s something that will be used (aka a tea towel) then all the long strands would get caught on something, if your fabric is quite sheer you’ll see all the carried lines, and it’s possible to accidentally pull some of the floss crossing at the back up with other stitches. That’s not a biggie though, you just poke it back down. Here’s a tutorial I did talking about the back of your projects, hopefully that will put your mind at rest enough you’re free to play. 🙂 https://peacockandfig.com/2016/11/shouldnt-worry-back-cross-stitch/
Nancy .Mc Curdy
Hi Dana, i have enjoyed all the comments you and readers. .My question is, when you put your project in a frame to display,can you use a frame with glass?
Dana Batho
Hi Nancy! Absolutely, glass will protect the piece from getting dusty. If your project has beads in it though, you may have to either remove the glass or use a spacer between the glass and the stitching (not usually possible with a store-bought frame), or use a shadow-box type frame. 🙂
Crafting adventures – Cross stitch! – What Alicia Thinks
[…] not going to tell you how to cross stitch. Other people have done a much better job than I can of teaching a complete newbie how to cross stitch, so go look at that if that’s what you want […]
Nkechi
Thanks Dana for being available for all our questions xx
Dana Batho
Haha no worries Nkechi! 🙂
sharyn bratsberg
Dana
I have a design that covers the full piece of fabric so I will start in the left hand top corner as you suggest. Next dumb question, do I start in the left corner and stick with the same piece of thread wherever the next stitch of that color is? or do I rotate through thread colors starting at the left top corner and moving from one stitch to the next changing colors each time a different color is shown in the pattern.
Thanks!
Sharyn
Dana Batho
Hi Sharyn! That’s not a dumb question at all. 🙂 There are two main ways you can work across a full coverage piece — parking and the cross country method. I’ve got a tutorial that shows both here, have an experiment and see which one you prefer. There is no right or wrong. 🙂
https://peacockandfig.com/2015/07/parking-versus-cross-country-stitching/
Sandra
Loved your videos. Thank you! I had a question about back stitching a finished project. I had a pattern made from a photo using a computer program. After finishing the project, I realized that the pattern did not indicate where I should outline. This is a picture of a dog and I’m having a lot of trouble trying to figure out where I should outline the project. Do you have any suggestions, tips, etc? I’ve always used kits so this is a first time for me being on my own.
Dana Batho
Hi Sandra! Cross stitch software cannot add backstitch into a design automatically, particularly if it’s using software where a chart cannot be altered. Designers literally draw the backstitch into designs by hand. So you’ll have to print out your chart and draw over it with a pencil to indicate where you want your backstitch lines to go. 🙂
Sandra
Thank you so much! This is a great option for me to try. Frankly, I took on a project I am probably not qualified to do at this time. I’m thinking it might look better without outlining it because it may ruin the whole project if I mess it up. I am definitely going to outline it on a copy of the pattern to see what it will look like. Thanks again!
Dana Batho
You’re very welcome Sandra, good luck! 🙂
Holly
Hi, I bought a cross stitch kit that requires 3 threads to be used, but I have no idea how to do that. I know for two threads you use the loop method, but what about 3?
Dana Batho
Hi Holly! You wouldn’t use the loop method — you can either use a small knot, a waste knot, or a pin stitch. If you search “pin stitch” on my site, you’ll find a couple of tutorials that might help. 🙂
Patti
Hello Dana,
I just wanted to reach out and say thank you! I’m just getting started on cross stitching and your beginner’s videos really cleared up my questions and concerns. I’m definitely going to make your peacockandfig site my go to place. Your instructions are clear and your advice will be heeded by me.
Thanks again!
Dana Batho
Awesome, thanks so much for your feedback Patti! I’m glad the tutorials help! 🙂
Margaret
I am using a legend that is labeled full and 1/4 stitches. I know what color of thread to use but not sure which stitch to use. Can you help me?
Dana Batho
Hi Margaret, sorry for the delayed reply! I don’t know sorry, each designer does their charts differently. If you belong to any cross stitch groups on Facebook or elsewhere, post an image of the legend and see if someone has done a pattern from the same designer, they might be able to help. 🙂
Nkechi
Hi Dana,
Is it ok for circular frame to be on stitches you have already completed? It causes an indent / crease on the aida, now worried my work will be circular indented? Thanks
Dana Batho
Hi Nkechi! It’s totally fine for your hoop to go over stitched areas, the only time you have to be a little careful is with French knots and beads (the hoop could crush the beads if it’s not loosened enough). Don’t worry about hoop marks on your Aida, when you wash and iron your piece at the end, those marks will disappear. If you’re not going to be stitching for a while (like more than a few days), taking your piece out of the hoop will minimize the hoop marks. 🙂
Nkechi
Thank you so much 🙂
Dana Batho
You’re very welcome Nkechi! 🙂
Talena
Hi Dana, thank you so much for your videos. Can you please clarify something for me? When you thread a needle, are you supposed to pull it all the way through so the ends meet? Or only partially through?
Dana Batho
Hi Talena, thanks for your question! How you thread your needle depends on how many strands you’re using. If you’re using two, you can either do one longer strand doubled (called the loop method), or you can do two single strands. It also depends on how you’re anchoring your thread. If you’re using the loop method (https://peacockandfig.com/2015/04/beginning-and-ending-threads-loop-method-pin-stitch/), your loop end is going to be longer than the other end (with the two ends of the floss). Whichever end is going to be the anchoring end (whether you’re using the loop method, a small knot, weaving the ends under other stitches), that end will be longer than the other. It’s best not to put one strand through the eye, then match up the ends (and knot them). The reason is then your needle is actually attached to your floss, so if you make a mistake and have to unpick the last few stitches, you’re going to have to cut your needle off the floss to do that. It’s near impossible to backtrack your stitches with the needle still attached to the floss. Here’s a tutorial I did on needle threaders, this has some examples of threading various needles, I can’t remember if I show a lot of how the thread hangs once the needle is threaded — https://peacockandfig.com/2017/09/needle-threader/. I hope that helps! 🙂
Ray
I know this is an odd comment, but where did you get the salmon pattern you showed in one of your tutorials?
Dana Batho
Hi Ray! It’s called “Spirit of the Sockeye,” it’s by Blaine Billman, it’s so amazing (I’m still slowly working on it). You can get it from the Stitching Studio online, here’s their site — https://stitchingstudio.com/work_art_main.htm. 🙂
5 Adult Crafts that will help you relax - Blog Aecetia
[…] cross stitch is also a very entertaining craft, in which you can create your own paintings to decorate your […]
Cross Stitch Kit
Modern Cross Stitch Pattern and Cross Stitch Kit at Doityourfamily. I spend almost my free time for all kinds of crafts, especially crochet, embroidery and sewing.
Cross stitching update! | roxanne leung
[…] continuing where I left off. However, I received some helpful tips from Dana Batho, the author of “Beginners cross stitch: the ultimate tutorial” . She recommended I keep my thread shorter to avoid knots. Another challenge I experience often is […]
Crafty Corner: Trying Something New In Cross-stitch
[…] never tried cross-stitch before it did take me a little while to get my head around it! I found Peacock and Fig’s how to video really helpful just to get my head around the basic premise of cross stitching. But […]
Cross stitching is awesome! | roxanne leung
[…] materials I would need in order to start the cross stitching process. Sapna had sent me the article “Beginners cross stitch: the ultimate tutorial” which was also very helpful and a great resource! So, after a trip to Michaels, I purchased the […]
DONNA MCKINNEY
I am using an 11 count cloth says we use 3 strands embroider, 2 strands. Does this mean use 3 strands or two to sew with? I used two but it is not covering up the stamped pattern can you help me?
Dana Batho
Hi Donna! I’m sorry you’re having difficulties, that’s never fun. Without seeing the actual chart, I’m not sure — many stamped cross stitch kits come from China, and the instructions haven’t been translated well. For 11 count I’d definitely use 3 strands, but whether that means you’ll run out of floss I’m not sure. If you’re in any cross stitch groups online (like on Facebook), you can share an image of the colour key or instructions, and there’s likely to be someone else in the group who’s done a similar kit. Good luck, I hope you figure it out! 🙂
Paula
Hi Dana!
I love all your videos! You helped me learn how to cross-stitch and now I am hooked!
I was wondering if you had already wrote a blog or created a video about how to put the tread in the needle for backstitch, 2 treads, 3 treads. You showed the loop method in one of your video and I cannot figure for the life of me how to insert the tread in my needle.
Thanks for your help and your very helpful and wonderful tutorials!
Paula
Dana Batho
Hi Paula, thanks for your comment! I’m glad the videos have helped you learn, that’s great! I don’t have a video specifically about how to thread your needle, but for backstitch it’s usually only one thread. So if you trim off the edge of your strand of floss (so it’s a nice straight edge), and carefully put it through the eye of your needle, that should work. Many people also dampen the end of the floss a bit, that helps it go through the eye of the needle easier. Don’t forget, with backstitch it’s easier to use a sharper needle (not a tapestry needle). You can also use a needle threader, you can get them at any craft or sewing store. Just be careful to not pull too hard with a needle threader, sometimes the fine wires in the threader aren’t secured very well and they’ll pull out with too much tension. Here’s a link to a good article that has some pictures you can see – http://www.sew4home.com/tips-resources/sewing-tips-tricks/hand-sewing-thread-needle-tie-knot. 🙂 If I’m threading two strands for my loop method, what I do is fold the floss in half, and then I actually feed the loop (the folded part) through the eye of the needle. If you’re wanting to thread two or more strands without using the loop method, what I do is fold the floss very tightly over the eye of the needle (folding it in half near the end of the floss). Then I pull the needle out, keeping the floss folded very tightly in between my fingers. Usually that flattens the floss so much you can just push the eye of the needle over the folded floss, and your needle will thread that way. Please let me know if any of these tips help, or if you still need some help with photos or something. 🙂
Andrey
Hey Dana! I love blogs and videos of cross-stitch for beginners. I also love one men also cross-stitch, embroidery and texture designer. Can you do more videos on manbroidery. I am also a beginner cross-stitcher and as you may have guess I am a proud male to say that a cross-stitcher.
Dana Batho
Haha hi Andrey, thanks very much for your comment! I may be doing a video about “men who make textiles” at some point, the head of Kreinik threads is the son of the original founders and might be available to talk about what he does. I’m not sure when that would be, but I am thinking about how to best do a video interview like that. 🙂 Have you heard of Rosey Grier? I wish I’d known about him before I did my manbroiderers video, he’s an ex-NFL player who ended up getting really involved in stitching (and wrote his own needlework book for men). Apparently his hands were so big, he had to get his wife to thread the needles. 🙂