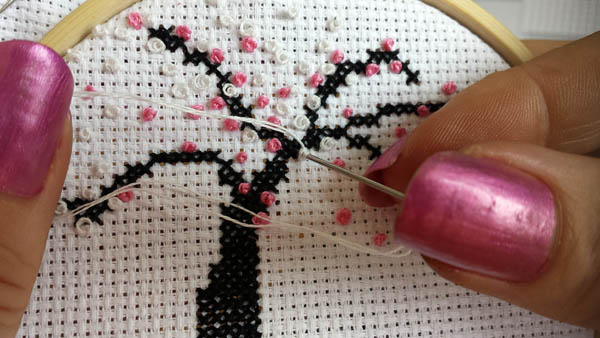
It’s incredible to think that something as simple as French knots or Colonial knots can create fear, but this tutorial will help you enjoy them. In many of the cross stitch Facebook groups I belong to, so many people struggle with French knots in particular — I have seen some people even say they won’t buy certain patterns because they happen to have French knots in them. Others simply replace the knots with small seed beads. There is also the Colonial knot, which many have recommended to the French knot-phobic as a simpler alternative. So in this video tutorial, I’ll be showing how to do French knots and Colonial knots, and explaining the likely reasons stitchers sometimes find them difficult. I’m also providing a free pattern that you see me working on in the video, you can get that in the freebie section of the shop.
Click here for your free pattern!
French knots & Colonial knots: tutorial
Final tips
- For a colonial knot, you make a backwards C, then place the tip of your needle under the upper arm of the C. Wrap the tail of your thread in the opposite direction around the tip of the needle, creating a figure 8.
- For a French knot, wrap the thread twice (or more) around the tip of the needle.
- Make sure your needle goes back into the fabric in a different place than where it came out.
- Keep slight tension on your thread in your left hand to prevent knotting as you draw the thread through the fabric.
- You can push the knot to the tip of the needle just before going back through the fabric and anchoring it with your fingertip — this will keep the knot in place and help prevent it from becoming too loose
- Use a milliner’s needle or any other embroidery needle where the eye is the same width as the shaft. Do not use your tapestry needle. A finer needle will result in a tighter knot.
Finished pattern


Links mentioned in the video
So I hope that helps all of you who have been traumatized in your life by French knots! If you have any questions or comments, or would like something clarified, please let me know in the comments below! 🙂


16 Responses
Mona faber
I have never had a problem with doing French knots. I learned to do them at age 10.I also learned to do cut work embroidered pillowcases at about the same age. Don’t see cut work embroidery very much any more.
Dana Batho
Yeah you do still see a lot of cutwork in embroidery guilds and at big embroidery seminars and such, but it’s hard to make “contemporary,” it is a very traditional craft. It’s also not really pictorial, and these days newer stitchers taking up the craft tend to want to make something that is an image (like a flower, some text, etc). 🙂
Karen Brettschneider
I am of the group who prefers seed beads to French knots. Ugh! I really hate them. But I will try this pattern and see what happens. I already see pretty beads replacing the knots. Yep, knots are my phobia. Still will give it a shot.
Dana Batho
Haha please do give it a try Karen, I love beads but they’re not the same as a knot. French knots have a really beautiful texture, beads just can’t replicate that. 🙂
Marny CA
Not sure if I posted before about this . . . but in case I haven’t:
I am ambidextrous but sew holding a needle with my left hand. I’m usually ok with automatically reversing what right-hand sewers do but maybe I’ve been doing the winding of the thread wrong. I have had trouble with French knots.
For a left handed stitcher, how do you wind your thread around the needle for a French Knot or for a Continental?
Thank you always for a wonderful site.
Dana Batho
Hi Marny! I’m not sure about the Colonial knot, I think you should be able to wind that the same way as I do in the video, but for the French knot likely it will work if you wind the floss counter clockwise (I usually wind it clockwise around the needle tip). I also always drop back down into the fabric just above where I came out, that helps lock the knot in place with that direction of a twist around the needle. So give it a try with counter clockwise, I hope it works out for you! If not, it’s entirely possible clockwise will work, it just might be less natural for your right hand to wind clockwise than counter clockwise. 🙂
Violetta
This is a very helpful tutorial. I, too, have had difficulty with the French knot. (I would summon all my courage before progressing to that stage of a project.) You’ve provided clear instructions. I look forward to applying the tips to my next cross stitching project…with confidence!
Dana Batho
Awesome, I’m glad to hear it Violetta! Since putting that tutorial online, I’ve had SSOOOOOO many people say they’ve never been able to do French knots (even stitchers with 30 years experience), but this tutorial helped them finally master them. So I have full confidence you’l be able to do them as well. 🙂
Linda
Thank you so much for your wonderful video. It helped me finish a project for my friend. You did a marvelous job simplifying the directions. You are a great teacher. I recognized your talent because I’m a retired primary teacher.
Dana Batho
Awww thanks so much Linda, appreciate it! I used to teach in Japan, so that experience definitely helps. 🙂 I’m so glad you were able to finish your project! 🙂
Christine Chipman
How do I login if I return to your site and want to look at a new pattern and/or tutorial, please? I’ve joined up, but cannot find a place to login.
Hugs
Christine
Dana Batho
Hi Christine! I’ve just sent you an email with a detailed response, you should get that very shortly. 🙂
Angel
After cross stitching for well over 30 years and avoiding knots for equally as long, I watched your tutorial on colonial and French knots. I tried your cherry blossom pattern with colonial knots, and I LOVE IT!!! I am having so much fun making them. Such a nice change to the millions of x’s I’ve made. I’m anxious to find more patterns with knots. Thank you for your wonderful tutorials. You’re an awesome instructor and artist.
Dana Batho
Hahaha awww thanks very much Angel, I appreciate it! And yes, it’s great once you learn how to do knots in a way that works for you, they’re such pretty stitches. 🙂
Pam
How do you anchor the French and colonial knots at the beginning and at the end?
Dana Batho
Hi Pam, thanks for your question! It depends on how many you’re doing, and whether they’re on a sheer or translucent fabric. If you’re doing a whole bunch in one area, I’d anchor them the same way as you would any stitch and just drag the floss across the back from knot to knot. If you’re stitching them on more delicate fabric and they’re scattered all over the place, you could use a pin stitch to anchor them. Here’s a link to a blog post and tutorial video about that — https://peacockandfig.com/2015/04/beginning-and-ending-threads-loop-method-pin-stitch/. I actually just use small knots a lot of the time. I know some stitchers are really fearful that knots will show through the other side when a piece is being framed (as big lumps can show up), but if you’re putting a French knot over the top then there really isn’t anything to worry about — there’s already a “lump” from the French knot. You could also anchor the beginning of your stitch with a tiny stitch using the loop method (also in the same video), then form your French knot over top. I’d just experiment and see what seems to work best for you, each stitcher has their own preferences, and it does depend on the actual pattern and the fabric you’re using. Does that help?