
Want to learn to cross stitch like a pro? Have a look at this list and see if you know all these cross stitch tips and tricks that experienced stitchers live by! You’ll not only end up with a nicer finished product, but you’ll enjoy this addictive craft even more!
Disclosure: Please note that some of the links in this post are affiliate links and if you go through them to make a purchase I will earn a commission (such as from Amazon). Keep in mind that I link these companies and their products because of their quality, and not because of the commission I receive from your purchases. I would never recommend something I wouldn’t use myself. 🙂
1. Clean hands
It seems like common sense, but wash your hands before touching your fabric or floss – you’ll wash your piece when it’s done anyway, but there’s no point getting your floss and fabric dirtier. If you’re not sure how to wash your piece, click here for a video tutorial on the easiest way to wash your cross stitch piece when you’ve finished stitching it (and why you should wash it). If you’re using hand-dyed floss or fabric (or floss from a kit), it’s always a good idea to pre-wash it before stitching to get rid of any loose dye that may stain your project later.

2. Loop Method
Use the loop method for starting threads if you’re using an even number of strands (or a pin stitch if you’re not) – here’s a video link showing you exactly how to use the loop method and pin stitch.

3. Length of embroidery floss
Measure your floss strands using the length of your fingertips to your elbow (double it if using the loop method to start) – this length is just perfect for reducing the amount of tangles in your thread.

4. Protect your fabric edges
If you want, you can protect your fabric edges with a zigzag stitch or a small amount of Fray Check. You can also use painters tape to seal the edges of your fabric. This will help prevent your edges from getting banged up and fraying while you work on your project. Fray Check can be bought at most needlecraft shops, or even the craft section of big stores like Walmart.

5. Untwist your needle
Keep untwisting your thread every now and then. Drop the needle and let the floss unwind or hand twist the needle. Most people naturally will rotate the needle slightly with every stitch which makes your floss slowly start to twist up (I need to untwist in a counter-clockwise direction). You can also use techniques like railroading to keep the floss parallel and neat, but just remembering to untwist my needle every few stitches works just as well. If the floss is twisted, it can create an odd texture in your stitches and the fabric will show through your stitches more.


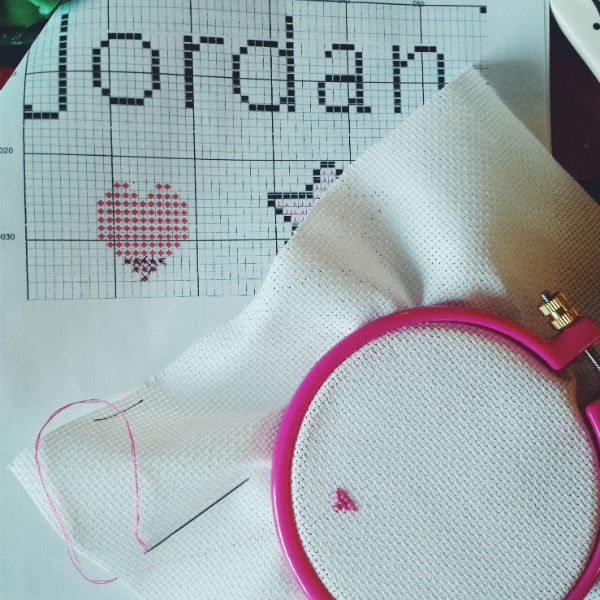
6. Check your counting
Count count count and double check your counting. You can keep track of where you are by marking your pattern (paper or digital) in various ways, or you can just count. I don’t mark my patterns as I sometimes take a photo with my phone and hang it on my sewing frame. I then read the pattern directly from the photo (pic below). So make sure to double count, it really helps minimize mistakes. And tip #7 will really help you with not making counting mistakes.

7. Gridding cross stitch
For bigger pieces, gridding is a godsend and will save you hours of time (and your sanity) – you can see the video demonstration here of how to grid your cross stitch project with a fabric marker or mechanical pencil. Don’t forget to check that your chosen method of marking the fabric will erase/wash out cleanly before marking up your entire piece of fabric, and check the linked post for “issues” that can arise later with fabric markers or mechanical pencils. If you prefer having a fool-proof method to grid your fabric that’s reusable, check out this post about how to grid your fabric using fishing line.

8. Try making your own pattern
If you’re wanting to make a quick gift or to help teach a child or beginner to stitch, here are some good tips to help you make a simple cross stitch pattern. You can use software or needlework graph paper and coloured pencils.
9. Use a frame
Use a sewing frame (like a scroll bar frame) if you’re having a hard time holding embroidery hoops or Q-snap frames (or need to stitch while reclining like I do). You can even try just holding the fabric with no hoop at all and stitching using the sewing method, many stitchers prefer it. If you do want to try a sewing frame, there are variations that stand upright, as well as lap stands and stands that you can clip your existing hoop or Q-snap into. You can even turn a scroll bar frame into a lap frame really easily and inexpensively – here’s a blog post showing you how to make legs for your scroll frame.

10. Don’t worry about rules
Don’t stress about how other people stitch, or what the “right” way to stitch is. For example, unless you genuinely enjoy making both sides of your piece look perfect, don’t worry about how the back of your piece looks – many stitchers were taught by their grandmothers that “the measure of a good woman is how neat the back is.” Unless your piece is going in a fair to be judged or is being stitched on very translucent fabric, there’s no need to be concerned about carrying threads or the occasional knot. Cross stitch is meant to be relaxing. And quite often the back of an embroidery piece has a really interesting personality all its own, as the back of my “Pieta” test piece shows below. Also don’t worry about doing techniques like the parking method (as opposed to cross country stitching) if it’s just not your style. Even keeping all your top threads going the same direction isn’t a set-in-stone rule – some artists switch it up to create texture in a piece as the light will fall differently on the colours. Just do what you like, experiment, and don’t worry about what anyone else tells you is the “right” way to do cross stitch.

11. Bonus tip: Relax!
Don’t forget to have fun and relax! Cross stitch is proven to be hugely beneficial for your mental and physical health — you can see one article here on the mental health benefits of cross stitch. If you’re having a bad day stitching and just can’t get into it, put it away for a day or so and come back to it refreshed. There are also several ways to get your stitchy bug back if it’s gone on vacation without you. And join in with many of of the online groups to discuss cross stitch, it’s a great community out there! Feel free to post pictures of what you’re working on onto any of my social media pages, I’d love to see what you’re up to!
If you enjoyed these cross stitch tips, please share this post and help out other stitchers. 🙂
Want to see some recommendations of stitchy materials and tools, as well as stitchy books? Head to the Peacock & Fig Amazon page! 😀


59 Responses
Karen
Hi Dana, my grandmother cross stitched and had two chairs and a foot stool upholstered with her work. I’ve always loved these items and when she passed she left them to me. I use them every day and absolutely cherish them.
They are over 50 years old now, possibly closer to 65 or 70, and some of the stitches are beginning to pop or rub down. I was wondering if the fray spray that you mention would help strengthen it or if there is something that I could do to help prolong the life of these items? Could I possibly get thread of the same color and stitch over some of the areas that lost some of the cross over? Thank you so much for your help. I can send pictures if it would help. I’m not quite versed in this so I may be describing poorly.
Thank you!
Dana Batho
Hi Karen! Unfortunately there’s pretty much nothing you can do to prolong the life of them, except for to stop using them entirely. Even if you found threads a similar colour, dye lots would mean it would be very difficult to exactly match (especially for vintage threads, dyes used are very different now to be safer, etc). Plus you’d have to take them apart to restitch those stitches. Occasionally you can find needlework restorers to help repair/restitch sections, but that’s very specialized work and can be very very expensive (like I know the Royal School of Needlework in the UK does some conservation work on important historical pieces, etc). So my advice unfortunately would be to stop using them entirely and just have them as pieces for viewing, they’re going to continue to get worse with wear. I know many people who do stitch things like pieces for footstools, etc, never actually use the stool, it’s just for decorative purposes (as any usage will start to wear down and deteriorate the threads and fabric). You could try contacting any large local museum to see if they have fabric conservators and can give you advice, but other than that there’s not a lot you can do unfortunately.
Debbie Mathisen
Hi Dana, I really enjoyed reading your tips. I have been x stitching for at least 15 years. Totally self taught.
Never worried about what the back looks like. Once it is framed you can’t see the back. I have used masking tape on the edges and don’t recommend it. You do get end up with a residue. Stopped using tape. I just go around the edge with a stitch or take the material to my machine and run a zig zag stitch along the edge. Never thought of fray check. I will have to try that. I started using the loop method to start my thread a few years ago. Never read anything about it just felt it was much easier. My big project now is one I have been working on a piece on and off for 10 years and am almost done. It has 42,320 stitches in it. Maybe I will get done this year. I don’t recall seeing how you recommend washing the finished piece. I usually just soak the piece in cold water with a touch of dish soap, rinse and than block it to dry. Thanks for all the info you posted
Dana Batho
The link to how to wash your projects is in tip #1 Debbie, or you can just search “washing” on my site. If there are hand-dyed flosses or fabrics (or either of unknown origin), I’d be careful washing though as it may leach dye. Have fun finishing off your giant project, that’s a huge accomplishment! 🙂
Hanka
You’ve saved my joy of stitching! I’m a beginner and even after more than 35 years I can still hear my Grandma saying that awfull sentence about back of the stitching. She mastered many styles and techniques, BUT: she learnd them in the times, when girls had nothing else to learn than stitching, piano playing and French conversation (in the times of Austrian monarchy). So let’s have fun even without perfection!
Dana Batho
Awww I’m so glad it helped Hanka! And yeah, it’s sad that so many were taught in a way that sucked all the fun out of the craft for them, at least you no longer have to live with the same fate… 🙂
Tracy Andoe
I have made several large pieces and can’t believe I did them without gridding them. It is saving soooo much time. Thanks for the tip!
Dana Batho
You’re very welcome Tracy! 🙂
Adam Golightly
I liked what you said about how the back of the piece doesn’t matter as long as you don’t care what it looks like and can make stitching more relaxing. My mom has been trying to find more ways to spend her time and try connecting to her grandmother. She would really like to get some help from a professional so that she will have the right needlework supplies so that she can cross stitch better.
Dana Batho
If she goes to amazon.com/shop/peacockfig, she’ll be able to see some of my recommended supplies. 🙂
KRISTIN HAMILTON
I watched your video on YouTube for colonial and french knots in cross stitching. I loved it. It made it so much easier to understand. The only questions I have is how do you best start a set of them when that color is used nowhere else, and how do you best end the sting?
Dana Batho
Hi Kristin, glad you enjoyed it! Just use a small knot to start and stop. You can also use the loop method to start, you’ll just need to make a little anchoring stitch (or pin stitch) where you’re going to start your first knot to hide the stitch. 🙂
Georgja
Hi, I am 17 and super new to cross stitch and have been given a lot of really old packs that come with the threads.
I have been wondering how do I do one square cross stitches that are at least 4 squares away from each other? (If that makes any sense) so blue is at a top left of a 3×3 square and then the next blue is at the bottom left of the 3×3 square.
Do I just do square 1 and cut the excess thread off and then go to the next square thats 4 squares away? Or can I use the same thread and just end at square one and start at square 4? Would it use more thread? If its just 1 square in that colour do I need to use a type of glue to keep it there or will it stay there? Any technique to keep it there?
Apologies for all the questions. I started a cross stitch ages ago after finding some small sets my mother bought over 20 years ago and still haven’t finished a piece yet because the instructions have gained holes from the folds. (A mistake on my end I believe.)
So I started a new one by The Gouverneur of some Lorikeets, that I was given a few days ago that is way bigger than I thought it would be.
Dana Batho
Hi Georgia! Don’t worry about all the questions. 🙂 Yes, you’d just carry the thread across the back, it actually uses more thread to knot off and then reknot (or use another anchoring technique) a few stitches away. Plus then you’d end up with more knots on the back, which can make the project lumpier or your needle can get caught on them from stitching adjoining stitches. So just carry the thread, the floss is very inexpensive (like even if you paid $1/skein, that actually works out to two cents per single strand metre). 🙂 My rule of thumb is just to not carry the thread across the back more than a couple of inches (depending on the project). I’m not sure if you saw my big roundup of beginner cross stitch tutorials, you can get to that here — https://peacockandfig.com/2017/05/cross-stitch-for-beginners/, that might help you with some tips and tricks to get you on your way faster. Happy stitching! 🙂
KRISTIN
I watched your video for the loop and pin stitch and love it. It makes things a lot easier, but was wondering for the pin stitch how do you do it when you are working the last spot in the complete piece?
Dana Batho
Hi Kristin! You can bury it under one of your last stitches, just nudge the X aside slightly and work your pin stitch underneath it. 🙂
Roxie Smedsrud
Hi! I was wondering if there was a way to soften the aida cloth when you begin a new project so it is not so stiff. I have a hard time hooping it and keeping it that way.
Dana Batho
Hi Roxie! It depends on the type of fabric you’re buying. A lot of Aida has “sizing” in it to make it stiff, so if you wash your fabric before stitching on it you may get some of that out. But if it’s a general craft store brand, then often that will generally be stiffer just from the way it’s made, so there’s not much you can do about it. I do recommend buying higher quality Aida, like I use Aida from Zweigart (a company in Germany, but most needlework shops and bigger online retailers like 123stitch.com will stock it), and it’s buttery soft to work with, even without prewashing. Hope that helps! 🙂
Josette
Hi Dana! Thank you so much for telling everyone e the back doesn’t matter!i have been stitching for over thirty years. My girlfriends and I use to meet every Monday night, stitch, have wine and catch up. We called ourselves “ The stitch and bitch”. We still meet very often and stitch and even took the stitch and bitch on “the road” and go away every year to the same place for a weekend of stitching. This will be year 10, It’s incredible. Point is, stitching is suppose to be fun and relaxing. If you lose that, it’s sad. It’s something I look forward to each and everyday. To stress over the back, something no one will ever see, is a wasted joy. So thank you for not making people feel bad about the back. Happy stitching!
Dana Batho
Haha yes, I set up a weekly stitch & bitch in my building, it’s been going for over 2 years now. It’s more of a “drink and bitch,” but we definitely get some stitching done… 🙂 And agreed, stitching is meant to be fun, people who are too serious about stabbing a piece of fabric repeatedly with a sharp piece of metal can get bent… 😀
cherney
I’m working on a cross stitch and I need to add more fabric. How would I do this?
Dana Batho
Hi there! Honestly, the easiest way is to start over on bigger fabric, I know that’s really sucky to hear. It’s near impossible to line up another piece of fabric and get the holes matching up perfectly for both layers, have enough of an overlap deep enough that the fabric edges won’t fray, or make it so you don’t see where the join was (as there will be a visible “seam” where the two fabrics meet). If you’re not too far along in your project, the best thing to do is start again with the right size of fabric, and make sure you’ve measured it correctly. Best to leave at least a 2-3″ margin on all sides above what the finished size will be, and be very careful when starting that you’re starting in the right place. <3
Rain Youngblood
Hi Dana, the number 7 suggestion for how to use the fishing line link, leads to Fray Check again. Is there another link for that how to? Thank you in advance. P.S. Lots of good info, thanks again.
Dana Batho
Hi Rain, thanks for that! There were two links in that one that led to the tutorial, it was just the second one I’d updated wrong. It’s all fixed now, thanks very much for letting me know! 🙂
Jim
Dana, I am looking for a little advice, if you don’t mind. I just finished a cross stitch piece that is large. It was a kit, but they only left one inch around as a border. I like to sign and date my pieces, but with the one inch waste land, there really isn’t much room to sign it. The piece is The Last Supper and I don’t want to take away from the piece once I frame it. Do you have any suggestions? Thank you for your blogs, I find the ones that I have read very helpful. Thank you. Jim.
Dana Batho
Hi Jim! What I’d recommend is sign it on top of the stitching, but in a colour of floss that’s very close to what you’re stitching over. Then it’s still visible, but not detracting from the overall project. That’s how artists sign their paintings and drawings, over top of the finished piece, so I think you can do it too. 🙂
Linda
What lap frame do you find is the easiest for you to use if you have a disability. I also need to recline due to severe back pain. I cross stitched for years about 20 years ago and have decided to begin again due to stress and pain. I needed to refresh my memory and found your tips to be spot on. I am OCD however and just have to have my pieces look neat on the back.
Dana Batho
Hi Linda! I use a Lowery stand now, it sits next to my chaise lounge which I recline on. You can swing it away from you when you’re not working on a project, and you can also flip your piece really easily without removing it from the stand. If it’s a really large project though, you’ll likely need something sitting on the other side of you to help support your sewing frame, and you may need weights on the base of the stand so it doesn’t tip. I got mine from Sew & So in the UK, even with the shipping and exchange rate it was less expensive than purchasing it from within Canada. I also got the extra wide L bar, then I have options with how close I need to sit next to the frame. Hope that helps! 🙂
Denise
Thanks for the tips!
The back of my cross stitch piece looks like a mess. Yours so beautiful and clean. How can I clean up the most part of the back of my piece?
Dana Batho
Hi Denise! Depending on how long you’ve been stitching for they will get neater over time, but honestly, don’t worry about it. Compared to some stitchers, mine are a mess. Do check out this article, having a neat back is usually not important at all — https://peacockandfig.com/2016/11/shouldnt-worry-back-cross-stitch/ 🙂
Maria
I am self-taught and found that for Number 3. Length of embroidery floss, while I find that doing the length of thread from fingertip to shoulder to be the minimum, I have found that doing the length from fingertip of one hand to the shoulder of the other side to more helpful. I also found that dividing the skin into 8 comes to the same lengths. Long enough to not feel like I am wasting floss on a big project but not too long that it frays.
Dana Batho
Nice, that’s good to know about dividing the floss into eight. 🙂 That’s the great thing about stitching, there are no real rules so you get to play and figure out what works best for you. 🙂
Joan
I’m curious about your recommendation of Fray Check. When I was stitching in the early ’90’s, the “hard core” stitchers were adamant that it would cause irreparable harm to the fabric and should never be used on pieces that you wanted to last more than a few years. These same ladies (99.9% were female) banned licking your thread to help get it through the eye of the needle because spit would cause spots on the fabric. Were they crying ‘wolf,’ or should we worry about this?
Dana Batho
Haha thanks for your question Joan! I’m not sure about Fray Check, but most people would be putting it on the edges of their fabric, not directly on the stitching. So even if it yellowed the edges very slightly over time, it’s not a big deal as you’re going to be using so little of it. Using tape or whatever is really not recommended (unless it’s acid free), as the adhesive in the tape definitely will yellow your fabric, and it could creep further beyond the edge of the tape if the glue is really acidic. I think if there were major issues with Fray Check, either the company would have reformulated the ingredients so they were more PH neutral, or they wouldn’t be selling it anymore. And the licking the thread thing has nothing to do with creating spots on the fabric (unless you were drinking a lot of red wine at the time). 😀 Licking your floss used to be a no-no as the process for fixing dyes used chemicals that could be toxic, you really didn’t want to be putting that in your mouth. It’s recommended to wash your piece at the end anyway (unless you’re using hand-dyed fabric or floss), so any “issues” with your saliva leaving marks wouldn’t apply. Also, some dyes might not be colourfast, so that little bit of dampness could leach colour out of the floss onto your fabric. Some people have also have had issues with the eyes their needles rusting, as the floss is always damp when being threaded. So their floss would shred as the eye of the needle was sharp and cracking from tiny bits of rust (which could also transfer onto your floss). I don’t believe in any hard core “do’s and don’ts” of stitching, the whole point is to enjoy yourself. 🙂
Faith
Great tips!
I guess I have been making my floss length way to long so I will try and adjust that 😉
Dana Batho
Haha that’s ok Faith, it happens. 🙂 Glad you enjoyed the tips, happy stitching! 🙂
Khurshid Khoree
Very interesting. I learnt a lot by reading Top Ten Cross stitch Tips and tips and suggestions given by other stitchers. Thank you Dana Batho, I am so very happy that I became a member of Peacock Lounge. Though I have been cross stitching for a long time I did not know the many ways and techniques of cross stitching.
Dana Batho
Thanks very much for your comment Khurshid, I’m glad you enjoyed the tutorial! Have a great day, and happy stitching! 🙂
Emily
Our readers will love this. I have included your wonderful tips in our Crafty Like Granny weekly Craft roundup 🙂 https://craftylikegranny.com/crafting-happiness/ Cheers Emily
Dana Batho
Thanks so much Emily, appreciate it! Have a great week! 🙂
Happiness Is A Way of Travel Not A Destination | Crafting Pursuits
[…] Peacock and Fig Top 10 Cross Stitch Tips […]
DJ
Great tips! Your Pieta looks beautiful! Can you share which chart you’re using?
Thanks!
Dana Batho
Hi DJ, thanks for your comment! It’s actually my own chart, it was the first time I’d tried using the software I’d just purchased (MacStitch, it’s called WinStitch for the PC version). It’s great, I use it now for all my patterns. I don’t have that chart on my site at the moment, but I’m considering putting it on. I’m not sure if you’re a member of the Peacock Lounge, but I always let my members know about new patterns on my site. If you’d like to join (it’s totally free and you also get access to my free patterns), just sign up at peacockandfig.com/join-now and then you’ll be notified of when it goes online! 🙂 Thanks very much, have a good day!
DJ
Oh, thank you! I just signed up 🙂 It’s very lovely, I would definitely be interested if you post it on your site.
Have a good day too! I’m enjoying exploring your blog!
Dana Batho
Haha not a problem DJ! I hope you enjoy the site, and I have a new freebie pattern in the design stage right now. So once that goes online you’ll get an email about that. 🙂 Happy stitching!
Robin
I remember when I was teaching a friend to cross stitch and I said,”When you wash it–” At that point, she interrupted me, “What!?” She couldn’t get past the idea that she would wash all that hard work. I tried to convince her that it would be okay, but she just couldn’t go there. Sadly, I think she finally gave up on xs because of that. Maybe she picked it back up later….
Dana Batho
Awww that’s sad, I hope she did pick it back up. If you’re still friends with her you could send her the tutorial video I did on washing your piece (it’s linked in the post), it’s so easy it’s almost effortless. Of course it depends on whether you want it to last or not, if it’s just a quick test project it may not be worth washing. But for the few minutes it takes and the benefits it gives, compared to spending weeks and months on a project it’s the easiest part of stitching. 🙂
Nance Cee
I have a tip. I usually turn about one half inch of fabric and stitch around the edges to keep my fabric from fraying. I turn the raw edge toward the working side of my piece. This is one way to make sure if I do soil the edge it will wind up on the back side of my work when I take the stitching out.
Dana Batho
That’s a good tip, thanks for that Nance Cee! 🙂 It’s like when I roll my fabric around my scroll bars, I do it so the bottom side of the fabric is “up” against the bars. That way your hands rest on the underside of the fabric. 🙂
Rita Rawls
Great tips. Thanks for sharing. I’ve been looking for a cross stitch pattern that my mother did 15 – 20 years ago showing the different stages of the cotton plant (we are cotton farmers!). My mothers pattern was lost and I sure would like to find a copy. Any suggestions?
Dana Batho
Hi Rita, glad the tips helped you! For your mum’s pattern, unless you know the name of it or the designer, it would be very difficult to trace it down. Now most designs are also available online, which means you can do an image search of a photo of the pattern (reverse Google image search) and come up with similar images. That often will give you the name of the designer and pattern. But older patterns often are no longer being produced, so the pattern image never really made it online for any retailers like 123stitch, Joanns, etc. The only thing I can suggest is try posting any images of it you have into some of the larger Facebook cross stitch groups. Someone may recognize the pattern or the style of the designer, and then you can see if it’s still available. If it’s been discontinued, sometimes you can find older copies of patterns on sites like eBay or even Etsy. I hope that helps! 🙂
Melanie
Dana,
Love your advice…and where were you when I was stitching years ago (particularly referencing #10)? LOL. I was such an avid cross stitcher. And then I met one of my husband’s co-workers, who was also an avid cross stitcher. She looked at my work, then (eek!) turned it over. Oh, the shame! She made a comment about how the back of my work was “messy,” and after that I lost a bit of interest in cross stitch, because then I felt the back had to look as good as the front (I was self-taught and nobody had ever previously said the back needed to look as good as the front). It killed quite a bit of the joy for me. I still cross stitch, but am nowhere near as prolific as I used to be. Wish I could have read your excellent advice back then…absolutely love it! By any chance do you have a time machine? 😉
I did later realize it had been the height of impropriety for “that woman” to have turned my work over, but at the time it left a very bad and long-lasting impression. I’d never do that to anyone…so wrong!
Thank you for your great advice! 🙂
Dana Batho
Hahaha “that woman,” yes she definitely shouldn’t have criticized your work. I know a lot of people were taught by their grandmas that the back had to look as good as the front, and I have no idea where that came from. There are some types of embroidery that are reversible (like Italian blackwork), but cross stitch is definitely not reversible. To me everyone sees the front, so losing your mind over what the back looks like is just a massive waste of time and energy. And you can only do so much to have the back look nice anyway, so it’s always going to be a losing battle. And let’s see, ten years ago I was living in Japan working at the Canadian Embassy and teaching English at a private school, so I probably couldn’t have helped you back then anyway. Glad you’re getting back into stitching — as Nike says, just do it. 🙂
Barbara Redlinger
I read last nite on person turned as over and said something to the lady…..check I didn’t know there are as police out there…but I probably would have asked where t he handcuffs are😀 I’ve been as ing 20-30 years and my backs still suck, but pictures are awesome…a little advice to all….you’re only limited by your imagination…try some shiny thread….beads….makes pic a little showy….ok I’m done…love your blog….barb
Dana Batho
Glad you enjoy the blog Barb! 🙂
Birthe
I enjoy your blog very much and appreciate your videos. Lovely work. I wondered if you have any tips for my next project–I’m doing a cover for a pillow and worried about finishing the pillow itself? Any tips would be much appreciated.
Dana Batho
Thanks very much for your feedback, I really appreciate that! 🙂 For your pillow, it would depend on exactly how you are going to make it. If you’re going to use the entire stitched piece as the front panel on its own (I’m assuming you’re stitching just one side of the pillow), here are a few ideas. I personally would finish off the edges of the stitched piece (either with Fray Check or by zigzagging or using a serger) before stitching it to your backing fabric. That way if it’s going to be a pillow case and the pillow will get removed occasionally, the edges of the stitching on the inside of the case won’t start to fray and get worn. I’d also consider machine (or hand) stitching your finished cross stitch to a backing fabric first, and then stitching that whole panel to the actual back pillow cover. By backing the cross stitch onto another piece of fabric first, it will give the stitching more structure and it’s less likely to warp out of shape. So then you’d have 3 layers of fabric – the top panel would be your stitching attached to a backing/support panel of fabric, and then the actual back panel of your pillow. If you’re going to centre your stitched piece onto the pillow (so it’s smaller than the actual size of the finished pillow), I’d first hand tack the stitching to the (larger) backing panel, and then cover those seams with bias tape and securely sew that down. That will completely cover your seams, so there’s no chance they’ll catch on anything or fray. Then you’d sew the back panel of the pillow to the front piece and complete your pillow.
There are lots of ways you could assemble your pillow, the main thing is making sure your stitching is going to be stabilized and strengthened (by sewing it to another piece of fabric) and then making sure your edges are safe from fraying or getting worn. If you’d like to post pics onto my Facebook page (at any stage of your assembly), I’m happy to give you feedback and ideas for next steps to take! 🙂 My Facebook page is at https://www.facebook.com/handylittlegadget. Good luck, I’d love to see your project! 🙂
Birthe
Thanks so much Dana. Absolutely good idea about stabilizing. I will send you photos as I go. The goal is to complete by end of August 2016. It’s a piece for a ring bearer pillow for a wedding. I usually do pieces that are framed or sewn into a bell pull, and all the pillows I’ve done before now have been needlepoint. Thanks for your reassurance–giving me courage to launch! All the best, Birthe
Dana Batho
Sounds like a great project Birthe! I’m sure it will be a piece that is treasured for a very long time, I look forward to seeing pics of it! 🙂