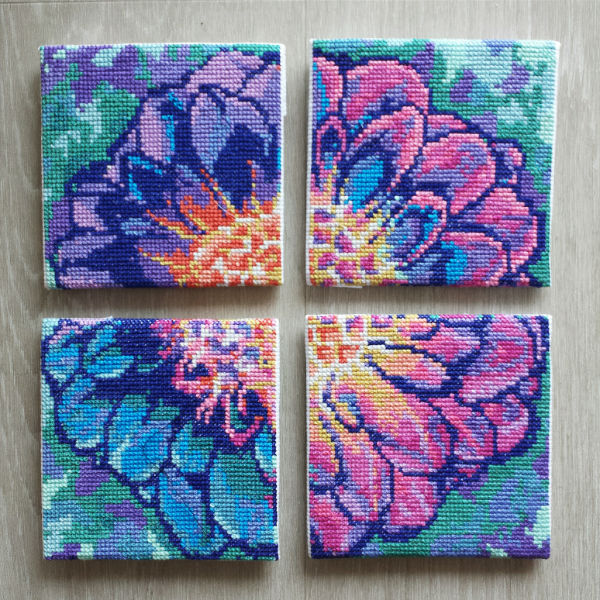
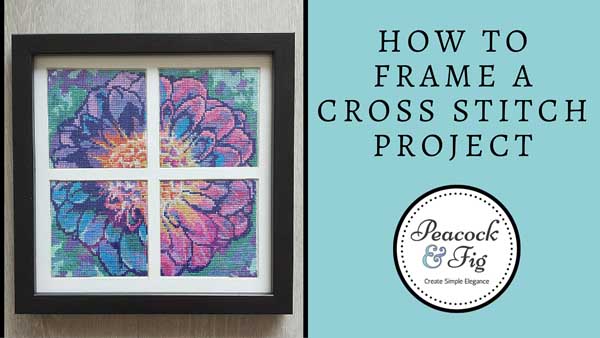
Framing a cross stitch project can seem daunting, but in this post I’ll be showing you how you can save yourself money and time by learning to stretch and frame cross stitch projects yourself. In the past few days, I finished up stitching one of my cross stitch designs I was working on over Christmas and New Year. It was my “Solarize Dahlia” cross stitch pattern, and you can see it in the featured image. I really love this design, and I’m so happy the colours came out exactly how I designed it. I’ve been getting some really good feedback on it, and a few people have been asking me how I framed it.
I stitched each pattern individually in a long vertical panel, as I had some leftover Aida that was just the right size. Once I’d finished it, I had to decide whether to frame each piece individually or in one frame. The patterns are designed to be 4″ square (on 14 count), so each one will fit into an Instagram frame. I had a quick look online and found a decent frame on Amazon that I liked, it kind of looked like a window pane. I ordered that one, and once it arrived I set to work doing the framing.
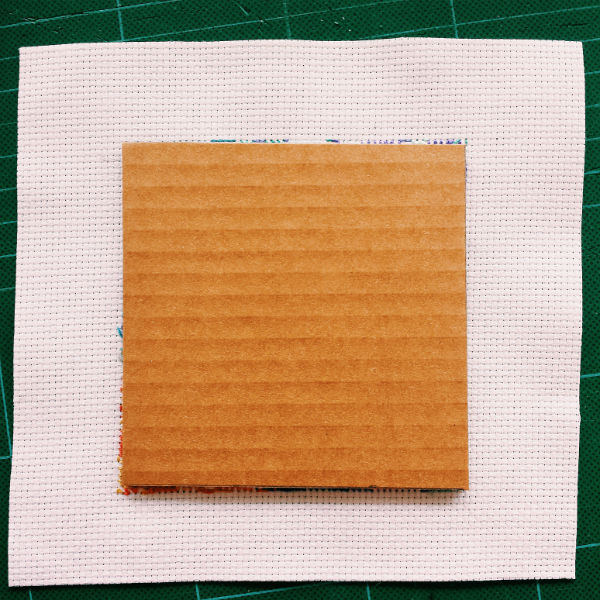
The frame came with a mat board already, but even though it said the windows were 4″ square, they were actually only 3.5″ square. So, I set to work making the windows slightly bigger with my mat cutting tool. You can see instructions and a video of how to do your own mat cutting here. I decided to make the windows just a little smaller than the 4″ the cross stitched panels were, as I knew I was going to tape them individually to the backside of the mount. Doing this helped make sure they didn’t slide around in the frame once it was hung on the wall.

Above is an infographic I made going through all the steps to get your piece framed. It covers what you’ll be stretching your stitched piece around and how to do the stretching and framing itself.
To download the image of the graphic, right click on the image to save it to your desktop.
Getting the size of the card right might be a bit of trial and error – if it the finished piece the same size as the frame, then it’s best if the card is just slightly smaller than the glass. How much smaller will depend on the thickness of the card (if it’s too thick your frame might not close properly), and the thickness of the fabric you stitched on. Obviously thicker fabric is going to take up a little more space in the frame, so your backing card will need to be a little smaller. You can test this by cutting the card to the size you think is best (often about 1/4″ smaller than the glass will work), and then folding the fabric around the card and putting it into the frame (unstitched). Although stitching and stretching will lie flatter than just folding the fabric around, it will give you a good idea of whether your card needs to be a little smaller or not.
For a piece that will be framed with a mat board (so the finished piece is smaller than the dimensions of the frame), the backing card needs to be a bit bigger than the mat windows. If the card is the same size or smaller, it will fall out and there will be no way you can tape the panel(s) onto the underside of the mat board. Try and find some acid-free tape so it doesn’t eventually start to yellow the fabric.
If you’re not sure how your first attempt at stretching and framing will turn out, try doing a smaller piece first. You could also try just loosely tacking the fabric at the back so you get comfortable with the steps. Stretching the canvas helps the piece to lay square and flat in the frame, but if worse comes to worse you can also frame unstretched pieces by using acid-free tape to attach it directly to the underside of a mat. It just might not look as flat and “polished” as it would if stretched.
Here’s a gallery of the steps involved, click on each photo for more details:


Some extra tips
- Do a trial with a scrap piece of fabric or a smaller cross stitch piece – it will give you confidence to work on larger pieces
- Use acid-free card and tape to prevent your lovely creations from eventually yellowing
- Double and triple check that the size of the backing card will work with the thickness of your fabric and frame (before you stitch the piece on the back at full tension)
- Keep your stitches at least 5 rows back from the edge of the fabric, otherwise the tension may pull that entire row out
- Keep flipping your piece over as you’re stitching to make sure that it’s still centered and squared up on the front
- If you don’t want to make your own mat, check out framing shops – often they will sell a pre-cut mat at a fraction of what it would cost to have a professional cut one
- For really complex pieces (or something that is an unusual shape), it may still be worth getting it framed at a professional framer. The above method of framing is great for small pieces, or pieces where you have enough leftover fabric in the margins to be able to wrap around the backing card. If you’re not sure, ask a professional framer for advice – there’s no point accidentally ruining a project you’ve spent months or years on at the last stage.
How to frame cross stitch video
Here is the video that I made of the photos I took during the demonstration – I go into detail about each step.
Please don’t hesitate to get in contact if you have any questions, I’d love to help you out! Don’t forget to share this post if you have friends who stitch as well! And don’t forget, there are free cross stitch patterns in the shop you can access to practice with too!
Want to see some recommendations of framing materials and tools, as well as stitching materials, tools, and stitchy books? Head to the Peacock & Fig Amazon page! 😀


4 Responses
Shell
As a custom framer, I do not recommend using cardboard. It contains acid which will eventually ruin your hard work. We use acid free foam board and pin the cloth (following the squares in the fabric) through the board around the edge. The lacing is a good idea but it will not give you a secure straight line like using stainless steel pins. Hope this helps 🙂
Dana Batho
Thanks Shell! Yes I know about acid-free boards and such, it’s just most people don’t have access to specialty materials so I wanted to show how to do it with just what you can get. Of course, I’d always recommend acid-free mounting, that’s going to give the best finish long term. 🙂
Pauline Goode
I have had my cross stitch canvas framed by a pro and the canvas now shows all the 1 inch squares in all the 17 x22 picture/ It did not show that when I brought it home 4 days ago. What can I do now?
Dana Batho
Hi Pauline! I’m not sure what you mean, do you mean the gridding you drew onto the fabric is showing? What did you draw your grid with? Some fabric pens don’t erase fully, or the lines can come back if the stitching is in a really cold area (like in the hold of an aircraft). I would take it back to the framer and see if he has any suggestions, without know what you drew the gridding lines with it’s hard to give you much advice unfortunately. 🙁