
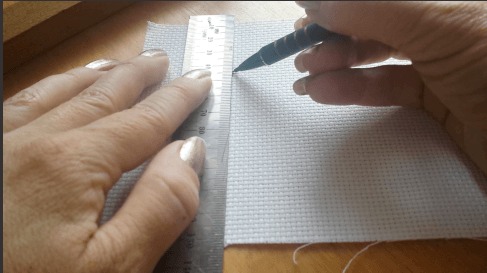
Recently I was online in one of the Facebook cross stitch groups I belong to, and a woman had never tried gridding cross stitch fabric, was having issues figuring out how to do it. I’d never really thought about how that might be confusing for some people – I’m really mathematically and artistically inclined so I saw someone else’s image of a piece of gridded fabric and just figured out how to do it on my own. In order to make the process easier to understand, I’ve made a video outlining how to draw a grid (10×10 stitches) onto 14 count Aida fabric. The process would be the same for any thread count, but if the fabric isn’t white then it might be a good idea to invest in a coloured fabric pen or mechanical fabric pencil. If you search “mechanical fabric pencil” online, there are hundreds of products that come up in many different colours.
One thing to note before gridding cross stitch fabric is to consider how long you will likely be stitching the piece for. Is it a small piece you’ll have done in a few weeks, or is it a larger piece that could take years to do? For larger pieces I would suggest gridding your lines using “thread.” At the beginning of the video I show a small sample of 22 count fabric that I gridded using sewing thread. I have done one small piece like that, but I found my needle did pierce the thread so it was hard to pull the thread out cleanly at the end. If you prefer stitching your gridlines rather than drawing them, there is a product called Easy Count Guideline that is a thin nylon thread. There is a link to a demonstration video on their home page, and then the thread is really easy to pull out and reuse as it’s not going to get split or caught into the needlepoint itself. There is also fabric called Magic Guide by DMC that comes pre-gridded, and the lines wash away with water (in the video I wasn’t sure about that, but I checked). Obviously the colours and sizes available for Magic Guide are going to be more limited than other types of non-gridded cross stitch fabric, but it might be just the solution for someone not wanting to spend a lot of time gridding out a piece. You can also stitch your grid lines in with fishing line like in this tutorial. For linen and evenweave fabric, because it’s so fine you may also find it much easier to grid with stitching rather than by drawing the lines on.
Potential problems with drawing your grid lines
In the video I do show a brief overview of a water-erasable fabric pen I just bought, but do be aware of the issues that can occur with fabric markers. Fabric that has been gridded with fabric markers may have the lines “reappear” if the fabric gets too cold. This happened to one stitcher I know — she mailed her piece to be entered into a competition, but as the mail got cold during the trip when her piece arrived the gridlines had reappeared in her stitching. One solution to prevent this is to wash your project when you’re done — you’d need to do this anyway to remove water-soluble pen lines, but washing your project will help remove any residue from the pen, which could re-appear later. Please obviously take care if you’re washing hand-dyed fabric or flosses, as they may leach dyes.
I do the demo in the video using a regular mechanical pencil (and erasing the lines with an artist eraser), but please be aware that this is not a fool-proof method. If your project has a lot of light colours in it, the floss can pick up the graphite as you stitch and become dirty or smudged looking. In the video demonstration, unfortunately the leads in the mechanical pencil were a bit too soft (so the lines were darker), so the pencil lines smudged a bit when I tried to erase them. When I did the actual gridding on my big Michelangelo piece that I talk about in the video, I used a different mechanical pencil that had harder leads in it (and thus the lines could erase cleanly as they were lighter). I didn’t trial the pencil I did use before filming the video, but in actual practice it’s not that big of a deal as I was just gridding that piece as a sample for the video (and I was pressing harder so the lines would be more visible on camera). If you do decide to use a mechanical pencil (now I would always advise people to stitch in their grid lines with nylon thread), and you do have issues getting the pencil out of your fabric, here is some advice from another stitcher: “I have had perfect results with no pencil lines left by soaking the piece in a bit of Tide and OxiClean. I let it soak for maybe an hour or two unless it is really heavy, then I would leave it overnight.”


Here is a small quick illustration of what a piece would look like fully gridded out. In the example I’ve said it’s 65 stitches across and 95 stitches down. So you would need 7 ten-by-ten grids across to accomodate the 65 horizontal stitches (with 5 stitches in the last column unused), and 10 ten-by-ten grids down for the 95 vertical stitches (again, with 5 left over). You should also allow for 3″ of margin on all sides of the fabric to make sure there’s enough excess to put into a hoop for sewing or to use in framing the piece when it’s done. All patterns will have a stitch count (if not on the cover of the pattern then in the pattern itself), and you can calculate the dimensions of the finished piece by dividing the number of stitches by the thread count of the fabric. So for the example above, if the piece is 65 stitches across and I’m using 14 count fabric (which means 14 stitches per inch), the finished size would be 65/14 = 4.6″. So the piece would be 4.6″ across, meaning the fabric would need to be at least 10.6″ across (as you need to add 3″ of margin to each side, making an extra 6″ added to the finished piece size). If the same piece was done on 22 count fabric, it would be 65/22 = 2.95″ (plus the extra 6″ of margin). If you have a hard time with math, it’s ok. Just draw a little picture like I’ve done and work slowly at figuring out how many grids you will have, how wide and long your fabric needs to be, etc. If you’re really stuck, leave a comment below with where you’re having a hard time and I’ll help you figure it out (I know I’m nuts, I actually do really like math).
I hope that all helps! If you have any questions or need something explained better, please let me know in the comments below!


67 Responses
Donna
Hi Dana! I have a question concerning the grid system. I’ve been working on a project for several months and using a grid has made it much easier (it’s the hardest project I’ve ever done). The problem I have is this: with every mini square I sew, there appears a kind of delineation line, where each square has a separation line between each square. It’s driving me nuts. How can I sew these grid squares without them looking like a separate square all over the image??
Dana Batho
Hi Donna! That’s called banding, it’s because your threads at the back aren’t crossing over each section “join,” and the change of direction at each “block edge” also changes the tension slightly. So the easiest way to prevent that is not to work in perfect blocks. Like make your stitched edges more zigzag along your gridlines, like 11 stitches wide on one row, 9 the row below it, etc. By changing up where you’re changing direction at the end of each section, you’ll prevent banding. Or just work across a couple of blocks at a time, rather than sticking specifically to one grid block area (and keep the edges from being “square” if that makes sense, no matter how big of an area you work across at once). Meander a bit more around the pattern and mix up how you’re carrying threads from block to block, and the banding will disappear. Hope that helps! 😊
Cheryl
Hi. My daughter wants a stocking that is in linen. Looking for someone who could change the pattern to aida thanks
Dana Batho
There’s no such thing as changing a pattern to Aida Cheryl, you can use any fabric and any thread count of fabric you like for any pattern (but gridding linen would be very difficult unless you stitched in the lines with fine nylon thread, then pulled them out at the end). But most stockings are full coverage, so it wouldn’t matter what the fabric is you stitch on, as it’s not going to be seen anyway. Linen is best used for patterns that have blank areas, so you can see the lovely texture of the fabric. 🙂 Just note that changing the thread count of the fabric from what is on the pattern means the finished size may be different, and the amount of floss you will use may be different. 🙂
Reneta Milanova
Hello dear,
I recently bought a cross stitch pattern called envi shoes.
I have never done sewing in my life
but now I would like to learn.
for this reason I bought this model because I thought it was easy. But after I opened it, I saw that I would not be able to do it without someone’s help.
please help.
I have a few questions
the first question is how to understand the instruction.
if you can explain it to me.
the second question is where to start sewing.
I watched your videos you start from the middle. in my model from the middle is empty
Please explain to me from where to started and where to finished this pattern.
Thank you so much.
Dana Batho
Hi Reneta! Unfortunately I can’t give you private one on one lessons on your pattern. If the centre of the pattern is blank, just start in the upper left corner. Just make sure you’ve measured your fabric correctly, and you’re starting in the right place. This tutorial might help — https://peacockandfig.com/2016/10/find-centre-cross-stitch-pattern/ 🙂 If you still need help with your pattern, I’d recommend joining a Facebook cross stitch group, and asking them to help you. Or you could do my Cross Stitch Fundamentals class on Skillshare, you can get a free two-month trial with my link. In that class I go through absolutely everything you need to know for materials, how to read your pattern and follow it, and how to finish off your project once you’ve finished stitching it. You can get to that class here (and it comes with a free pattern to practice with too) — https://skl.sh/2PBuPuv 🙂
Christine Machen
Good Morning
For all you ladies who are having trouble white what to use to grid your fabric , there are a lot of pens online ..I get mine from amazon.. that do come off with water but I personally use the ones that use heat to remove them, they look like felt tip pens and come in different colours and are not expensive and last for a long time.
Hope this helps you lovely Crossstitchers
Love Chrissy
Aline
After trying marking the fabric with fabric pencil (would not erase) and putting floss to mark grid (got caught up in my cross stitches) I tried the following and it has been a fantastic success! Using the needle make every 10th hole slightly larger. With good lighting the holes are visible enough so it’s easy to count. Grid the area you are actually workin on as the holes seem to relax some with time making them less visible. The grid not show on finished work.
Dana Batho
That’s a good idea Aline, I’m glad you found a technique that works for you! 🙂
Karen Reilly
My God your a patient person.
Dana Batho
Haha not really actually, it’s just the time spent gridding is time you save later counting and double checking endlessly, and time saved unpicking mistakes because you miscounted. You actually end up stitching faster when you grid your fabric, so in my opinion you actually end up saving time in the long run by gridding (especially for larger projects). 🙂
Rebecca
This is probably a dumb question, but regarding the erasing part. We are only worried about the lines that are extended beyond the design right? The pencil lines will get lost in the design as we stitch? I mean how else would we erase the ones I the design, unless we are expected to erase each line as we get to it? Sorry if that seems dumb to ask.
Dana Batho
Haha totally not a dumb question Rebecca, sorry I didn’t make that clearer in the video. 🙂 Yes, it’d be just the lines extending past the stitching, unless you’re going to get a professional framing job right up to the edge of the stitching and then you wouldn’t have to even do that. I will say though, some people have had a hard time using pencil, particularly if their fabric is “soft” and absorbs the graphite, it can get embedded in the fibres which makes it very difficult to erase (like if your pattern isn’t full coverage). Also if your pattern contains a lot of light colours, the floss can pick up bits of the graphite lines as you stitch over them, and become a bit “dirty” which obviously isn’t ideal. In which case you could use the water soluble pen instead of a pencil (but those lines can end up coming back, best to wash your project well at the end if you use one of those pens). Or you can stitch your lines in with fishing line, in the blog post is a link to that tutorial, then you just pull those lines out at the end of your stitching and there’s no residue or anything to erase or wash out. 🙂
Sarita
Dana,
Thanks for this site!!
A technical question, not about x stitch.. but I’m curious: How do you film the videos so it looks it’s from your point of view/eyes…?? Thank you
Dana Batho
Hi Sarita! I either had my phone on a small stand just in front of me (which meant occasionally I’d knock it while working), and now I film from directly above using a wooden stand my Dad made me. 🙂
Kathie
I tried clicking on Magic Guide and it is in French. I do not know French so can you tell me how to get an english version?
Dana Batho
Hi Kathie! That link was out of date, I’ve updated it now. You can just search “Magic Guide” and you can get it from many shops — any needlework shop will either stock it or be able to order it, and online shops like 123stitch.com and Amazon will also stock it. 🙂
Pamela Vitulli
I have a Bucilla pattern called Midnight Rendezvous from 2009. The blocks in the patter are 10 stitches per block. The Aida is 14 and in black. Wold it be of to change the Aida to 10 instead of 14.
Dana Batho
You can, but why would you do that? 14 count is the standard size for most designs, if you change it to 10 count Aida then your finished piece will end up bigger, and you’ll have to use 3 strands of embroidery floss instead of two (meaning you’ll use a lot more floss to finish the project than the pattern will indicate). Of course you can if you want, but the project will end up physically bigger than the pattern indicates. 😊
Amy Lawrence
Hey!
I decided to grid mine with a pencil, and I cannot get it to erase. I tried using the pencil’s eraser and the vinyl one you suggested (https://smile.amazon.com/gp/product/B0018N281M/ref=oh_aui_detailpage_o00_s00?ie=UTF8&psc=1). Any ideas? I’m freaking out. I was going to donate my piece to be used in my church’s silent auction fundraiser.
Dana Batho
Hi Amy! Did you test the pencil before gridding your whole fabric (like testing to see if it would erase cleanly)? Some pencils are denser than others, and can make the graphite settle deeper into the fibers of the fabric. But don’t worry, I just did a bit of research and this article has several suggestions (about halfway down the page) about various techniques to remove the pencil marks. Be careful that stain removers or alcohol-mixes don’t affect the colours of your floss, but I’m sure you’ll be able to get the lines out (assuming you didn’t draw them on super duper hard). No stressy, you can still donate your piece. 🙂 https://www.generations-quilt-patterns.com/how-to-remove-pencil-quilt-markings-from-quilt-blocks.html
DomV
I have gridded before, using rayon thread, making it easier to remove as I fill in the work. You mentioned a larger work. I am embarking on a new larger piece myself and didn’t think if my Aida cloth was warped. I should considering how much I quilt and understand grain lines. What do you suggest for correcting the Warp? I was considering soaking it and the stretching it like blocking with knitting. Ironing has a weak effect.
Dana Batho
Hi there! Yes you’re right, you should soak it and block it. If you can pin it to something while it’s drying to hold the shape, that’s ideal. Aida should go back into shape pretty easily once it’s blocked, good luck with it! 🙂
Wendy
Dana, Thanks for answering my question. Just to make sure, if I’m working on 32 count fabric, I count 32×32 squares on my fabric for my grid lines.
Dana Batho
Hi Wendy! No, you won’t make 32×32 blocks on your fabric — usually patterns are gridded 10×10. The grid you put on your fabric is exactly the same number of stitches as on your pattern, otherwise there’s no point in gridding. So if your pattern has 10×10 grids, then you’ll make 10×10 grids on your fabric. If you’re stitching over 2, then your grids on your fabric will be 20×20 (which equals blocks of 10 actual stitches). Does that make sense?
Rachel
Also, do you know how to do the loop method or some type of method other than a knot with just one string? My kit came with these colors wound around a cardboard insert. The string is actually 2 strings together…. but you can’t really separate them (it’s not easy to pull them apart. So essentially it’s one piece of string made up of two micro strings). If I double it, then I’ve got 4 strings. So I can’t do that.
And I can’t figure out a way to tie my needle bc the knot keeps coming undone and then I lose my needle. Just started 2 days ago but a few kinks.
1) need a method that does not create a knot for an odd number of strings
2) need to know how to knot my needle thread bc I keep losing it.
Thanks!
Dana Batho
Hi Rachel! What you’re looking for is a pin stitch, it’s a way to anchor your floss with an uneven number of strands. If you search “loop method” in the search bar on my site, you’ll see a video that has the loop method at the beginning, and a pin stitch at the end. And I’m not sure what you mean by your floss. Most embroidery floss is a thick strand consisting of 6 finer strands, you’d separate out the strands and use however many the pattern says to. If the pattern says to use two strands, you can separate out two strands and use them, or use one strand folded in half (making two). You don’t tie the floss to your needle, the knot would catch every time you pull your needle through the fabric. You just hold the tail end of the floss against the needle as you’re pulling it through the fabric. Keep a tail of a few inches, and just don’t pull the needle so hard you pull it off the floss. Hope that helps! 🙂
Rachel
Hey! So I started my first ever project. Idk if I mentioned I’m sure you’ve seen it. It’s Van Gosh Starry Night 16×12. I thought about a scroll but I looked at the reviews and they were terrible (no tension) so while browsing hobby lobby bc I lost my only needle I found these yarnology q clips or whatever. They are a square frame that holds the fabric taught, as you would of thought a scroll should. Anyways, made my work so much faster!
So I learned that … you don’t need to tie a knot in the thread around the needle bc you’re right. All it does is catch. I learned that after I commented on here lol. The kit came with thread wrapped around a piece of cardboard and it’s 2 strands already spun together (can’t separate) so that’s why I can’t do the loop method. I just watched your pin stitch vid and I am so excited to try that!! It’s going to make my piece look so much cleaner start to finish. My very first cube looks like a matted mess on the back.
I also watched your grid video. Made my grid. Then guess what. The legend was 2 pages, where they connect is ELEVEN boxes wide. So the middle of the legend is a 10×11 square and it completely messed my entire project up. I kept thinking “why is this not lining up am I missing something” then I thought about completely omitting that whole column but…. I’m just gonna go with it. See what happens bc idk what to do now. Sorry this is probably really confusing. But thank you so much for all your help gosh I seriously didn’t expect to love this as much as I do. I hope it’s not bad for my eyes. I’m 29 and literally have that aida like 1 ft from my face.
Love from KY!
Dana Batho
Booo that sucks about the grid being off, maybe whoever made the pattern is using non-professional software or something. 🙁 I’d just work around it, it’s a pretty expressive painting with lots of movement, you can afford to be a little “fudgy” with the details in that centre section. Keep the sections on either side the same, then just work around the main details in the centre section and kind of wing it. No one will ever know, and it will all come out fine. 🙂 I’d also contact whoever you bought the pattern from, that’s a pretty big error and they should fix the pattern. Good luck! 🙂
Rachel
I like the information in your videos for the most part, it kind of seems like your breathing is labored or maybe you’re wheezing?? Like you’re out of breath talking.
Why would you want to erase the line after you’ve covered it up with the stitch? What is the need to erase the grid?
Just picked up a 16×12 Vincent van gogh Starry Night and I’ve never ever cross stitched. It is a great hobby I really enjoy it so far.
Dana Batho
Hi Rachel! No, I’m not wheezing, I’m not sure why it sounds like I am. And you’d only erase the lines (like the grid that’s extended beyond the stitching area) that aren’t covered by stitches, or if a bit of the lines are still visible. 🙂
Wendy
Dana,
If you were gridding 22 count fabric, for instance, and are stitching 1over2, would you count 20 of those teeny weeny squares.
Dana Batho
Hi Wendy! Yes I would, you want your gridding to match the grid on your fabric. So if you’re stitching over 2 strands, then to get your grid of 10 as per your pattern, you’d actually be counting over 20 on your fabric. Hope that helps! 🙂
Hilary Ben Yitzchak
my chart does not have obvious grid lines. the colours of the stiyches are quite random, so gridding would be useful but as it is very difficult to see grid lines this isn’t much use. any suggestions?
Dana Batho
Hmmm, that’s very weird, I’ve never seen a pattern that doesn’t use grid lines. Maybe it was made by someone who doesn’t really know how to make patterns, I’m not sure. What I’d do is if you have a printed version of the pattern is to draw your own gridlines on the pattern, every ten rows and columns. You could use a highlighter, or a pencil, just make your new grid lines visible enough to see without blocking the pattern details. 🙂
Tammy
You are my hero! I have done counted cross stitch for over 30 years and have never heard about this magical solution! Thanks for the great tutorial, will be trying this as soon as I finish my halloween sampler.
Dana Batho
Hi Tammy, sorry it took me a few days to reply (I was away for Thanksgiving). Gridding is such a genius method, it works so well. In the post I did link to one using fishing line (or any nylon thread, Sulky Sliver, etc) — that’s really good if you’re concerned your pencil lines won’t erase (or could get your floss dirty), or your fabric marker lines not erase or come back later. I grid now using stitched lines, it goes pretty quickly once you have a few rows done and then you just pull the grid lines out when you’re finished stitching. You can even reuse them. 🙂
Penny from az
Hi love your video did I understand your reply that if I grid my fabric I don’t have to begin my project in the center? Thank you
Dana Batho
Hi Penny! That’s correct, because when you grid you’re replicating the darker lines on your pattern. So all you need to do is look at the row and column number on your pattern, and you can easily find the exact same spot on your fabric. You can either just count the grid lines on your fabric, or write the numbers or label them in some way. In this blog post there’s also a linked article about how to grid by stitching your lines in. It’s actually preferable to stitch your lines in (using something like fishing line or Sulky Sliver metallic thread). Then you don’t have any issues with your drawn lines not erasing or reappearing (which can happen with some fabric markers). 🙂
Pamela
I loved your video. I’ve been cross stitching on and off for 30 years and this is the first time I’ve heard about gridding the whole piece! I so wish I’d known about it before. I am now a quarter of the way through a counted birth sampler. Animals in four corners, different measurements! Baby’s long name in the centre. I sewed grid lines across horizontal and vertical centre but so wished I had thought about the whole thing! My giraffe’s face is now in the the last couple of letters of baby’s name! 😱😪. I have just finished unpicking the doomed animal, at least, the bits I’d stitched first because it looked ominous the further up I went! The pattern had a short name so the picture on the front looked lovely! Needless to say, this is the first birth sampler I’ve ever stitched. Your method of gridding will be my new best friend from further projects.
Dana Batho
Hahah awww, I’m so sorry your giraffe was doomed! It happens to the best of us, gridding is a really good way to make that a lot less likely. I prefer sewing my grid lines in now when I’m working on a big piece, then you can just pull them out at the end and there are no worries about lines not erasing, etc. There’s a link to the gridding with fishing line post in the article, but if you’ve already sewn in some basic grid lines you know what you’re doing already. 🙂 Good luck with finishing the project, and happy stitching Pamela! 🙂
Trina
Hi! I’ve been looking at a mechanical chalk pencil at my local embroidery store for this very purpose. Do you think it would work for gridding or would I rum the risk of it not washing out?
Dana Batho
Hi Trina, thanks for your question! I’ve never heard of a mechanical chalk pencil — you’d have to get a very fine pencil to draw your grid lines with, and I have a sneaking suspicion that a chalk pencil is too soft to be able to get that fine. If you’re worried about your lines not coming out, then just stitch your grid lines in with fine fishing line or nylon thread (or Sulky Sliver thread). Then you just pull the lines out at the end, you don’t have to worry about damaging your fabric at all. There’s a link in the post that goes to that tutorial as well. 🙂
Sarah Lair
I just gridded my piece for the first time using mechanical pencil. I had to erase a few that were outside the “frame” and it doesn’t feel like they’re coming out completely, but figured that they would with washing. I’m using white fabric and the first section is white thread as well. The thread looks gray now :(. Is this common? Don’t want to keep putting time in to this method if it’s going to mess everything up. Tia.
Dana Batho
Hi Sarah, thanks for your question! It does depend on your eraser, some erasers do erase more cleanly than others (I don’t know if you tested the eraser on your fabric before gridding all of it). In the video I’m using an artists vinyl eraser, they’re really good at pulling graphite off of surfaces cleanly. Once you get out as much as you can with the eraser, I’d gently handwash the areas that are a bit gray. I use clear shampoo and barely warm water, but you can use whatever you’d normally use to wash your projects after stitching. You can also spot clean the fabric with a bit of detergent and a soft, damp cloth. Make sure the cloth won’t stain your fabric though, use a white cloth if you have one. If the graphite doesn’t completely wash out the first time, do try it again, sometimes graphite (and dirt) can get a bit trapped in the fibres and need a bit of encouragement to get out. Just be gentle with your stitching, you don’t want to scrub it hard at all. Once you finish getting the graphite out, I’d wash the entire piece to make sure you don’t get any marks from bits of soap left in areas. That should get it all out. I hope that helps, good luck! 🙂
Sarah Lair
Thanks so much for your speedy response. Is it normal for it to turn the white thread gray?
Dana Batho
Hi Sarah, you’re welcome! It can happen, but I haven’t had it happen personally as the large pieces I do grid are full coverage. Basically what’s happening is the eraser is picking up the graphite, and if the eraser then touches the stitching, it can “deposit” the graphite back onto the floss instead of it erasing away cleanly. If you do try to erase more of it, make sure your eraser is moving away from the stitching (and preferably not touching it at all), then more graphite won’t get dropped onto the floss if that makes sense. 🙂
Sarah Lair
Sorry, I wasn’t clear. The graphite is transferring to the thread as I stitch.
Dana Batho
Oh, well in that case you probably drew the lines on too heavy, or the pencil is too soft (HB pencils are harder, B pencils are softer). If you can I’d erase where you’re going to be stitching in predominantly white. In the video the piece I was working on had some white areas, but I didn’t find the graphite transferred at all as I drew the lines on as lightly as I could and have them still be visible. So if you can, I’d erase where you’re going to be working mainly in white, and you can regrid that area with fishing line or nylon thread if you need the lines. There’s a link to that tutorial in the blog post, then you just pull the lines out. 🙂 I probably won’t be able to respond again straight away for now, it’s Canada’s 150th birthday and I’m about to head out (just don’t want to leave you hanging). 🙂
Sarah Lair
Thanks sooo much for your help. And happy birthday to Canada 🇨🇦!
Dana Batho
Ahaha you’re very welcome Sarah, I hope you can sort it out! And thanks! 🙂
Helen Richardson
I am trying to grid my fabric for the first time ever (although I have been stitching for years). I am doing a fractal on black 14 count. The finished size will be 25 x 25 so my fabric is 30 x 30. Should I start my gridding from the center and work out to the edge or start from the edge and work to the opposite edge?
Dana Batho
Hi Helen! Whatever is easiest for you — I usually start from the edge (in your case, 2.5″ in from one side as you have a 5″ border all around), but if it’s easier for you to start in the middle then do that. Just remember that you’ll be gridding in blocks of ten, so figure out where the most central grid lines will be on your pattern if you want to start in the centre. You may end up with a gridline right at the halfway point, or you might have a block of 10 “straddling” the exact centre of the fabric, depending on your exact stitch count. Does that help?
Chrissey
I was struggling with marking my fabric, my sister who lives in Australia is a Quilter she told me of the pen that’s looks like a felt tip pen but it washes out
ITS FABULOUS. I highly recommend them ..it’s like the pen shown in the video
Dana Batho
Haha that’s great Chrissey! Just be careful with some of those pens — some of them don’t actually fully wash out, or the lines reappear later. In another tutorial (that I’ve linked in this one), I show how to grid with fishing line or nylon thread. That’s great as you can just pull the line out at the end of your stitching project, and it doesn’t leave any permanent marks. 🙂
Carol Renteria
I don’t want to look foolish but, you erase your mechanical pencil lines “after”? you’ve stitched your project? Wouldn’t that pull/tug on your finished product making it look kinda of “ragged”? I’ve always used one strand of DMC to grid my pattern but think using a pencil would be nice to try if it really worked. PS I love your video tutorials 🙂
Dana Batho
Haha no it’s not a foolish question at all Carol! I would only erase sections that were open and unstitched — the stitching covers the rest. When I finished that pattern, I did erase around the edges of the stitching in the margin, but even that I didn’t really need to do as I matted it right up to the edge of the stitching when I framed it. 🙂 And you could also use fishing line to grid your fabric instead of some DMC — I have a tutorial about how to do that here — https://peacockandfig.com/2016/12/cross-stitch-gridding-fishing-line/. Then it’s a lot less expensive than gridding with DMC, and you can pull your grid lines out when you’re finished stitching. Then your stitches don’t get caught up in the line as well, as your needle can’t pierce it (and it’s fine enough it doesn’t interfere with how your stitches lie). The only issue with using pencil is you do have to really test whether it will erase fully or not before gridding your whole project (if it’s not full coverage). Some fabrics are softer than others, and some erasers will pick up the graphite better than others. 🙂
Penny
I am trying to get motivated and make time for a new large cross stitch project. I completed a couple approx 12″x12″ pieces about 20 years ago and want to take it up again but this time using stretcher bars. Question about drawn-on grid lines (I didn’t do that before – used unmarked Aida!) If the piece is completely stitched and has no unstitched areas, is there a need to erase or otherwise remove grid lines? For the large grayscale piece in the video, it seems to me that grid line removal wouldn’t be necessary. Is there another reason for removing grid lines even if they aren’t visible in the finished piece?
Dana Batho
Hi Penny, that’s a great question! I would say it depends what you gridded with. If it was with light pencil lines and you can’t see them from the front of the stitched piece, then don’t worry about it. Graphite is incredibly stable (as can be seen by the existence of some very old pencil drawings), so it won’t “leach” onto the floss or stain the fabric. Fabric marking pens are a different story. I don’t really use them much so I can’t speak from experience, but there is always the possibility that the ink could eventually discolour the fabric to the point that the lines are visible (even through the stitching), or leach onto the floss with age. I think the chances of that happening are very low, but it would depend on the quality of the pen, where the stitching is stored, etc. I have heard of fabric marking pen lines reappearing even after being washed out, simply because the piece got cold in the mail or an aircraft cargo area. For the big piece that I was working on in the video, I only removed the grid lines from around the outer edge of the stitching (in the margin), just to make framing a little easier. But since the matting covered the margins anyway, I didn’t even really have to do that. It all depends on what you’re gridding with (with pencil, you wouldn’t be able to erase the lines once they’re stitched over anyway), and how you’re finishing the project. If a margin will show (and thus the gridlines), then definitely get rid of them. If it’s going to be fully framed with matting, then that’s your choice whether to remove the lines or not. I’d try and rinse out lines from a fabric marker anyway just to prevent any potential leaching of pen dye, but I think the chances of that happening are pretty low. Thanks for your question, does that help? 🙂
Barbara
I have used the blue water erasable pen on off white aida cloth and because I took quite a while finishing my design I found that after I had washed my the design the blue marker had faded the material leaving a grid on parts that were not sewn, very disappointing after all the hard work.
Dana Batho
Awwww I’m so sorry that happened to your piece Barbara!! I guess it depends how old the pen was too, but it really shouldn’t do that. It is possible that with time those faded areas will darken slightly. I found one article that suggests washing the piece again with white vinegar in the water, but that woman was having a problem with the blue marked lines going brown, not bleaching the fabric — http://www.quiltersreview.com/water-soluble-marking-pen-nearly-ruins-a-quilt/. And here’s another article about various methods to try (in the comments), but again they were having problems with the lines showing up brown — http://circle.sewweekly.com/forum/topics/help-so-called-washable-fabric-markers-not-washing-out. If all else fails, maybe take it to a good dry cleaner. Often they have years of experience with fabrics and stains and all sorts of things, so they might be able to give you some suggestions. Let me know if anything works for you!
Shirley Hickman
Thanks for your response. I’ll keep your info in mind.
Dana
Hi Shirley, did you ever figure out how to get the gridlines out of your piece? I hope so, I can just imagine how hard that would be after all the work you put into your piece.
Shirley Hickman
Sorry. I kept trying to fill in my name but I couldn’t. Also I could not type in my email address. However, my name is Shirley Hickman. I am a Youtuber. I have a question. When you demonstrating how to grid fabric, one of the items mentioned was a mechanical pencil. How do you remove the graphite once the project is completed? I used a pencil. I tried to erase the gridlines, I soaked the fabric in cold water with dishwashing liquid and neither worked. Finally I gave up, sprayed the project with Shout, stuffed it into a sock and washed it with a load of clothing in my washer. Guess what, I can still see the lines. What do you suggest. I’d laugh if I hadn’t spent so much time stitching it. 🙂
I like the mechanical pencil cause I can see the lines more clearly and the lines don’t wear off when the fabric is being handled during the stitching.
Dana
Hi Shirley, thanks for your question. I’ll email you about the issues you were having entering your contact information. As far as the pencil lines, I found that using a white vinyl artists eraser worked really well for me in removing the pencil lines. In the video you can see the one I used smudged them a bit, but when I used a different eraser (I have several floating around) it worked perfectly. I’m thinking the particular eraser I happened to grab to use for the video demo was an older one or something, it sure wasn’t the one that I had done the test with before I started gridding out the big Michelangelo piece I’m currently working on. And I completely understand your frustration in not being able to get the pencil out, I’d be frustrated too. I’d do a bit of research online and see if there are any tips for removing pencil marks, then mark up a scrap piece of your fabric with pencil and see if any of the tricks works. It may just need a second bout with the Shout, or some other stain remover (orange-based stain removers often work really well but I’d do a test sample first to make sure it’s not going to damage your fabric or make any of your floss colours run). I’m not sure of the size of your piece, but if worse comes to absolute worse you could fill in the areas that are visible with floss the same colour as the backing fabric. It’s not an ideal solution obviously and it will take more time, but at least then you won’t be able to see the grid lines. I’m really sorry you’re having so much difficulty with the pencil, please do let me know what you end up trying and what works. If I was right there with you I’d love to help you figure it out, but I’m thinking that you’ll just need to do a bit of experimenting as each fabric would react differently to different cleaning methods (and some pencils are darker than others). Good luck, please do stay in touch and let me know how it goes!
Alissa Schachtel
My cross stitch kit has the grid lines and pattern pre inked onto the aida fabric. Should I be stitching on the opposite side of the aida so the lines dont show when its mounted? If yes, then I am stitching backwards compared to the pattern? Or will the ink wash out? Please help!
Dana Batho
Hi Alissa! No, you stitch on the side with the lines, otherwise you can’t see them, which is the point. They will wash out when your project is done. 🙂